With the most recent release of Infralink/IMMS (v3.5.31), we are happy to offer the following new features and functionality.
InfraLink Import capabilities have long supported the bulk creation and bulk update of certain data records (e.g., Case, System Element, Asset). Import functionality also now supports the bulk implementation of status transitions for both Case and System Element records. Users may import historical information for a Project already underway or efficiently status any work that may be incomplete. Additionally, this Import-Transitions feature for System Elements better aligns the InfraLink web-based user interface (UI) with existing mobile app capabilities.
It is important to note the ability to bulk transition statuses is subject to all associated workflow or life cycle restrictions. For example, if a Case Workflow requires New Cases to be Acknowledged before they can be In Progress, a direct transition from the New to In Progress status is restricted. Just as Users must perform two separate transitions (i.e., New-to-Acknowledged and Acknowledged-to-In Progress) via the UI, a bulk import must also account for both transitions. In this circumstance, the transitions should be two separate line items within the CSV import file, listed in chronological order. Please note, the Effective Time specified for each transition should reflect that chronology, as well.
Required Custom Fields - Global and/or Contract configurations often present required Custom Fields with certain status transitions. If Custom Fields are required for any of the target statuses within a bulk-transition import, those Custom Fields must be populated before the bulk import can be processed. Users should populate those fields via the user interface (UI) or a separate bulk-update import prior to attempting the import of bulk status transitions.
Permissions - Users' ability to perform bulk status transitions is restricted by the same Import Permissions that restrict bulk-create and bulk-update capabilities. These apply per record type (e.g., Case, System Element).
Import Files - Bulk implementation of status transitions requires the import of properly formatted CSV (comma separated values) file. See the tables below for details specific to Case and System Element record types.
Case Bulk Status Transitions Import File
Column Name | Details |
|---|---|
| UUID | If specified, the UUID is used to identify the Case. This field can be blank if the Item # is specified. |
| Item # | If UUID is not specified, then the Item # is used to identify the Case. This field can be blank if the UUID is specified. |
| Target Status | Required. This column denotes the Status to which the Case transitions. The target Status must be a valid target Status (i.e., correctly placed in the Case Workflow), and the Target Status Name should be entered and not the Transition Name. For example, the Transition Name might be "Acknowledge" but the Target Status name is "Acknowledged Case" so "Acknowledged Case" should be the entry in the CSV file. |
| Effective Time | This column marks the Date and Time (formatted mm/dd/yyyy hh:mm:ss AM/PM) of the transition to that status. If left blank, the Default Effective Time from the "Import Transitions" upload form will be utilized. If both this field and the "Import Transitions" upload form Default Effective Time are blank, then the current Date and Time at the time of processing the CSV row will be used. Transitions can also be backdated if necessary. |
| Comments | This column allows Users to add a comment for the Case transition. If blank, the Default Comment from the "Import Transitions" upload form will be utilized. If both this field and the "Import Transitions" upload form Default Comment are blank, “Case Transitioned via import” will be utilized for the transition comment. |
System Element Bulk Status Transitions Import File
Column Name | Details |
|---|---|
| UUID | If specified, the UUID is used to identify the System Element. This field can be blank if the Unique ID is specified. |
| Unique ID | If UUID isn't specified then the Unique ID is used to identify the Case. This field can be blank if the UUID is specified. |
| Target Status | Required. This column denotes the Status to which the System Element transitions. The target Status must be a valid target Status (i.e. correctly placed in the System Element Workflow), and the Target Status Name should be entered and not the Transition Name. For example, the Transition Name might be "In Service System Element" but the Target Status name is "In Service " so "In Service " should be the entry in the CSV file. |
| Effective Time | Date and time of the transition, in format mm/dd/yyyy hh:mm:ss AM/PM. By allowing a date and time to be specified, transitions can be backdated to when the work was performed. If blank, the Default Effective Time from the transition upload form will be utilized. If both this field and the form Default Effective Time are blank, then the current datetime at the time of processing the CSV row will be used. Transitions can also be backdated if necessary. |
| Comments | This column allows Users to add a comment for the System Element transition. If blank, the Default Comment from the "Import Transitions" upload form will be utilized. If both this field and the "Import Transitions" upload form Default Comment are blank, “Transitioned via import” will be utilized for the transition comment. |
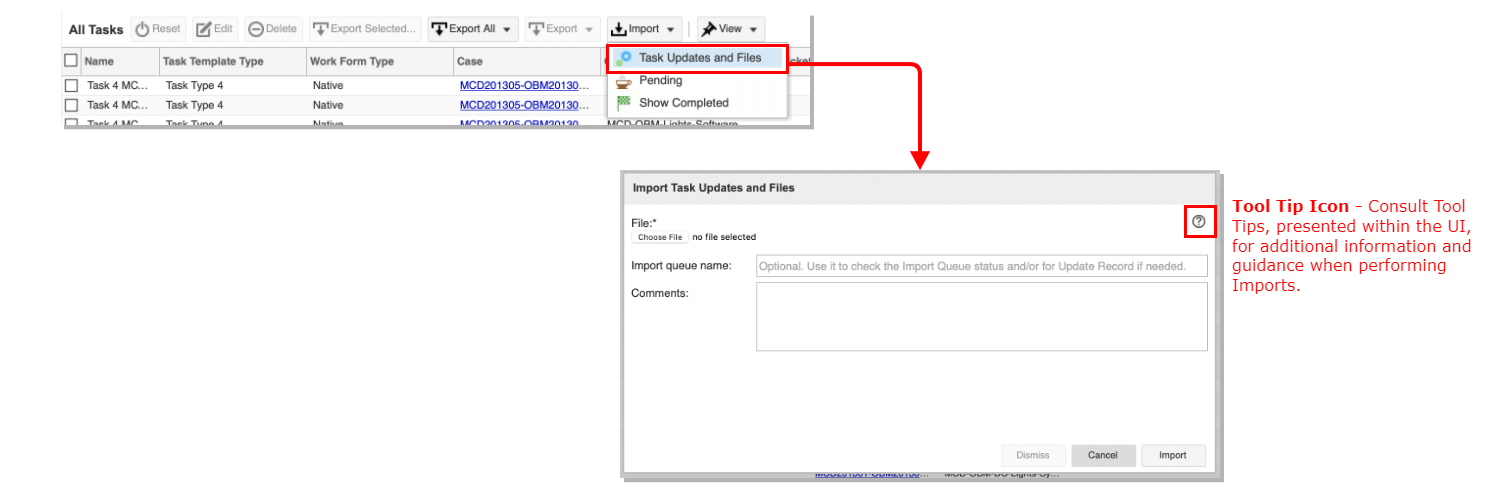
What You Will See in the User Interface:
![]()
InfraLink uses Device Tasks to manage and track the progress of production processes on System Elements. A System Element Life Cycle includes a set of statuses and allowed transitions between those statuses. One or more Tasks may relate to a particular status within that life cycle and must be completed in order to transition to that status. Device Tasks may be created by the Device Task Generator based on Work Package Template definitions or, depending on configuration, created manually by the User.
A single InfraLink project may have tens of thousands of unique Device Tasks, numerous parties responsible for statusing those Tasks, and a variety of documents to be complete across those Tasks.
To increase the efficiency and accuracy of completing Device Tasks, InfraLink now allows Users to bulk complete Open and In Progress Device Tasks while simultaneously uploading any associated documentation (i.e., PDF Work Forms). Please note, a PDF Work Form uploaded via this functionality will replace any previously uploaded Work Form associated with that Task.
Zip Import File - To bulk complete Device Tasks, Users must prepare and import a single ZIP file, containing
The Import File List.csv must include the six (6) columns below, with the same name and left to right ordering, although not all rows will have a value for each column.
Task Update and Files Bulk Import FIle
Column Name | Details |
|---|---|
ID | Required The Task ID can be determined by adding the “ID” column to the All Tasks grid view. |
Name | Task Name. This is not used by the import process but is something that a Project Administrator can use to help prepare and validate the information. |
System Element | The System Element ID is not used by the import process but is something that a Project Administrator can use to help prepare and validate the information. |
Completed | The date and time a Task is completed, in the following format: mm/dd/yyyy hh:mm:ss AM/PM. This will only be utilized, if the Task (based on the ID) is in an Open or In Progress status. |
Completed By | The User who completed the Task. The User name must match exactly to their Account in InfraLink and they must have the permission to complete the Task. This will only be utilized, if the Task (based on the ID) is in an Open or In Progress status. |
File | File to attach/replace to the Task. This will be the file name (including extension) of the file in the prepared ZIP file. Files can only be uploaded to Tasks configured to have a work form. |
Comments | Comment for the Task Update. If none specified, the comment from the “Update Comment” in the "Import Task Updates and Files" upload form will be utilized. |
Error Checking
The below table summarizes error checking that is performed via the Import process. Reference this table to better understand inputs and what can be altered for a successful import.
Task Status | Task Requires Work Form | Work Form in CSV | Completion Info in CSV | Result |
|---|---|---|---|---|
Open | Yes | Yes | Yes | Validate and Process |
Open | Yes | Yes | No | Error - Must complete Task to upload Work Form |
Open | Yes | No | Yes | Error - Task completion requires a Work Form |
Open | Yes | No | No | Error - No completion data or Work Form present |
Open | No | Yes | Yes | Error - Task not configured for a Work Form |
Open | No | Yes | No | Error - Task not configured for a Work Form |
Open | No | No | Yes | Error - Validate and Process |
Open | No | No | No | Error - No completion data or Work Form present |
In progress | Yes | Yes | Yes | Error - Cannot attach Work Form to in progress Tasks |
In progress | Yes | Yes | No | Error - Cannot attach Work Form to in progress Tasks |
In progress | Yes | No | Yes | Error - Task completion requires a Work Form |
In progress | Yes | No | No | Error - No completion data or Work Form present |
In progress | No | Yes | Yes | Error - Task not configured for a Work Form |
In progress | No | Yes | No | Error - Task not configured for a Work Form |
In progress | No | No | Yes | Validate and Process |
In progress | No | No | No | Error - No completion data or Work Form present |
Completed | Yes | Yes | N/A | (1) If form previously loaded, update form (2) Otherwise the Task was completed in InfraLink and the form filled out in InfraLink, therefore, Error - Work Form cannot be updated |
Completed | Yes | No | N/A | Silently skipped |
Completed | No | Yes | N/A | Error - Task not configured for a Work Form |
Completed | No | No | N/A | Silently skipped |
Functionality is currently limited to Device Tasks. Similar capabilities for PM Tasks may become available with a future release. |
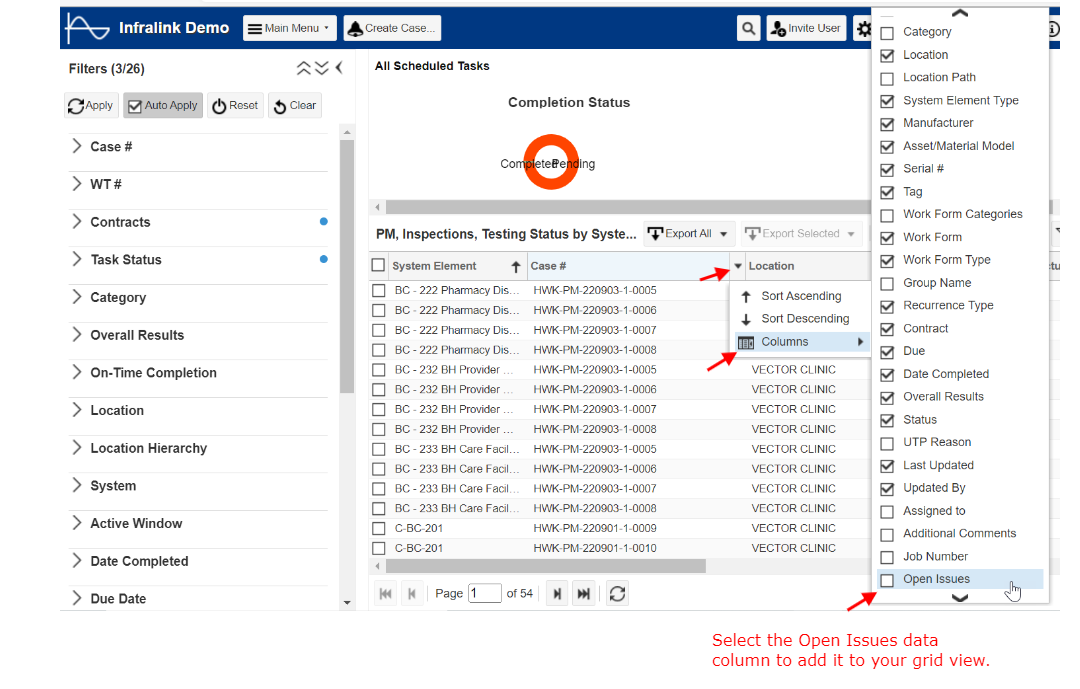
What You Will See in the User Interface:
System Elements represent functional components of a system design. System Elements may represent the overall system, assemblies, individual components, connections between devices and even the terminations and ports for those connections. Users may access System Elements from numerous views and records within InfraLink, including System Drawings, System Hierarchy and various Work Package views.
As Users navigate System Elements in a wide variety of contexts, it is helpful to create flags when there is pertinent information about those records. To this end, four InfraLink views now flag System Elements when they are subject to pending work (e.g., problem or repair Cases in an open status). The four views include:
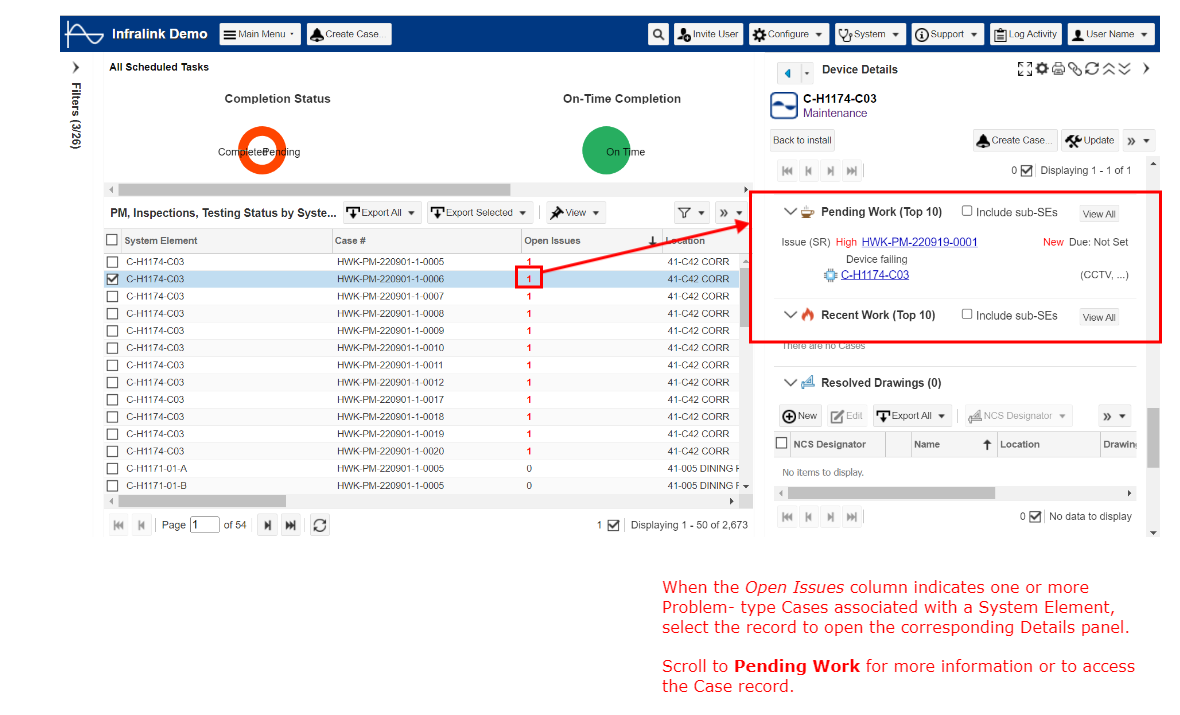
Open Issues is a newly available data column that can be added to any of the above views. The Open Issues data column displays a count of Open Issues associated with the listed System Element record. Where an Issue count flags pending work for a System Element, Users can easily select the System Element or Task record from the grid view and then navigate to Pending Work within the Details panel to review details of the open Issue.
What You Will See in the User Interface:
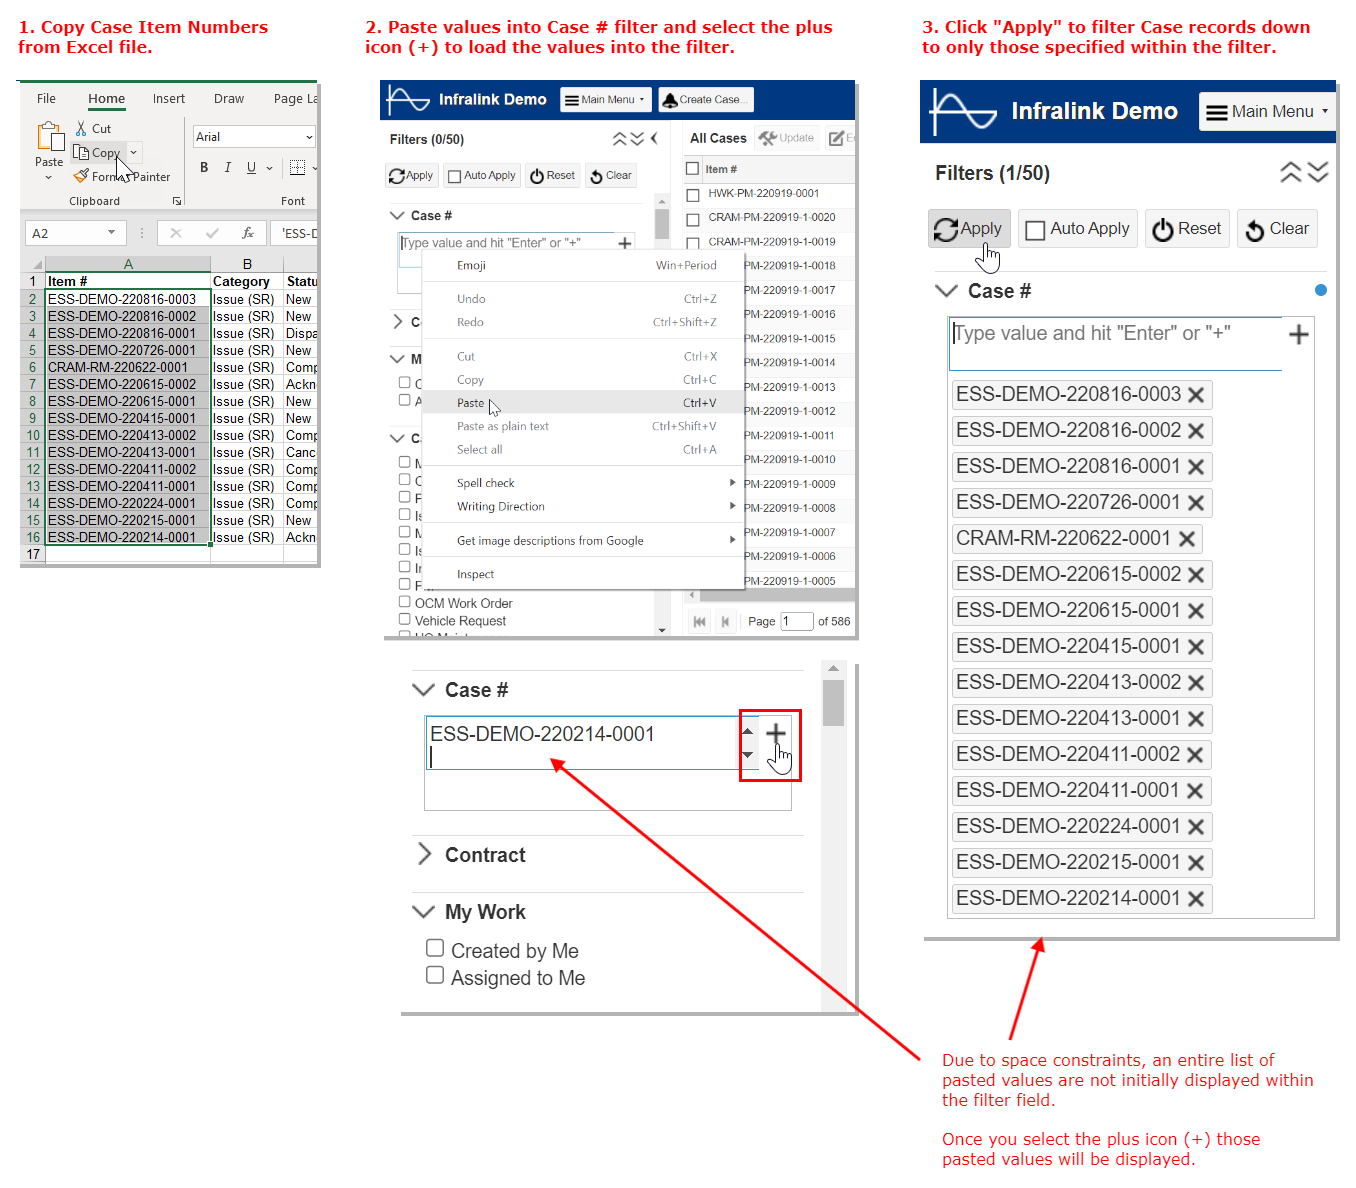
Users must sometimes track the progress of a group of Cases, which do not share attributes that support effective filtering. Because no combination of filters successfully refined the Case grid view to just the desired records, the User was required to manually enter the Case Item # for each record into the Case # filter and click the plus ( + ) sign to add each entry. This was time consuming and impractical for large lists of Cases.
To improve the User experience, the All Cases view now supports multiple-value entry into the Case # filter, when values are copied and pasted from an Excel spreadsheet.
With this filter enhancement, Users can now refine the All Cases view to display a specific list of Case records and then save that view configuration for future access and/or export. Additionally, that Saved View can be expanded in the future by opening the view, pasting additional values into the Case# filter, applying modified filter values, and saving the updated view configuration.
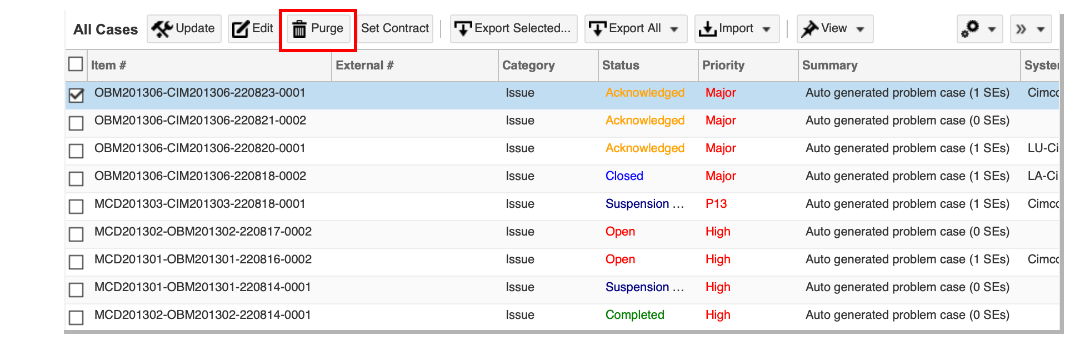
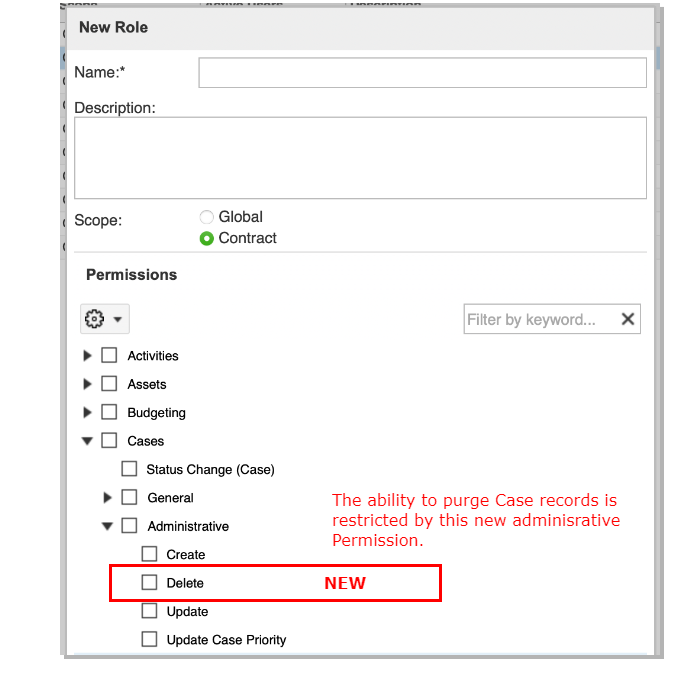
New functionality allows Users to now purge Case records, as well as any associated Work Tickets, via the All Cases, Work Packages, and Issue Monitor views. This feature provides the ability to remove duplicate or erroneously created Cases. Previously, Users' only was to transition such Cases to a Canceled status.
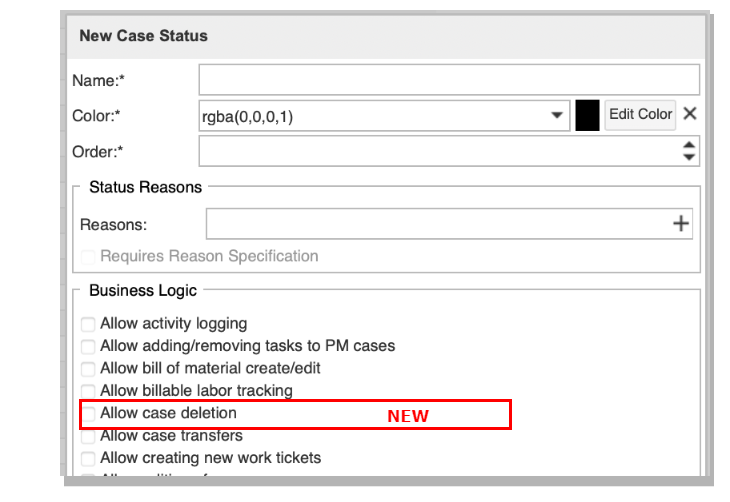
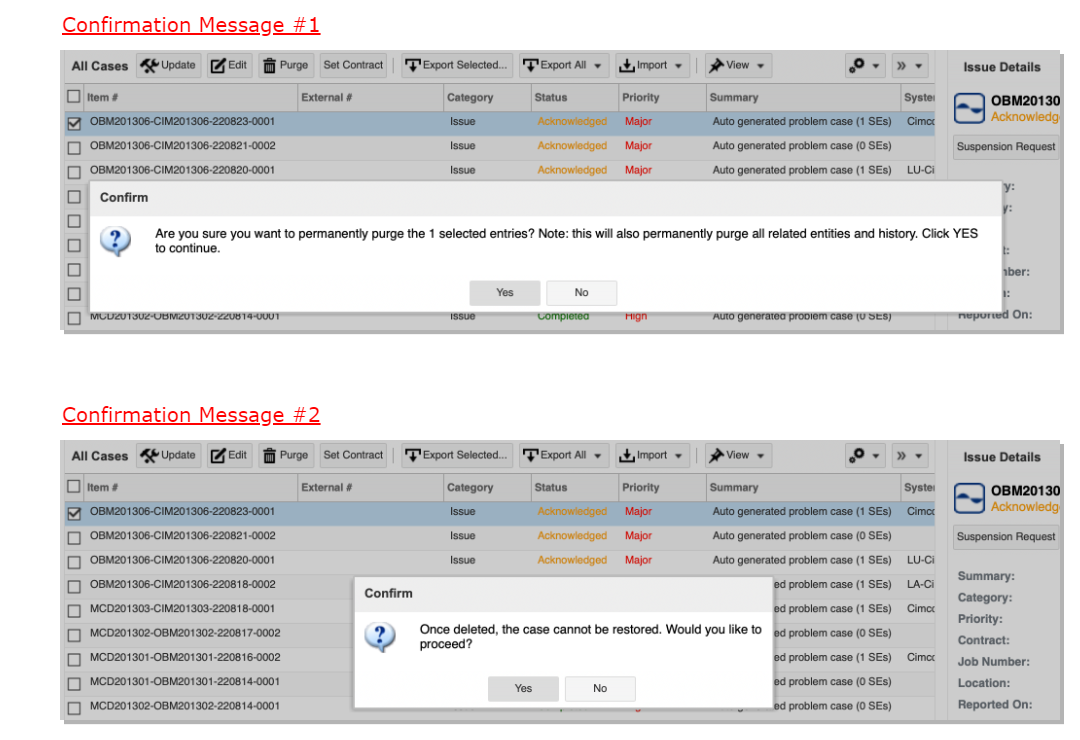
Purging a Case record(s) is an administrative function, which involves a two-step confirmation and is dependent on the following:
The Case purge functionality applies to Case records created manually and those automatically generated by InfraLink.
Case purging is permanent. There is no way to restore the Case or associated Work Ticket record(s) once deleted.
What You Will See in the User Interface:
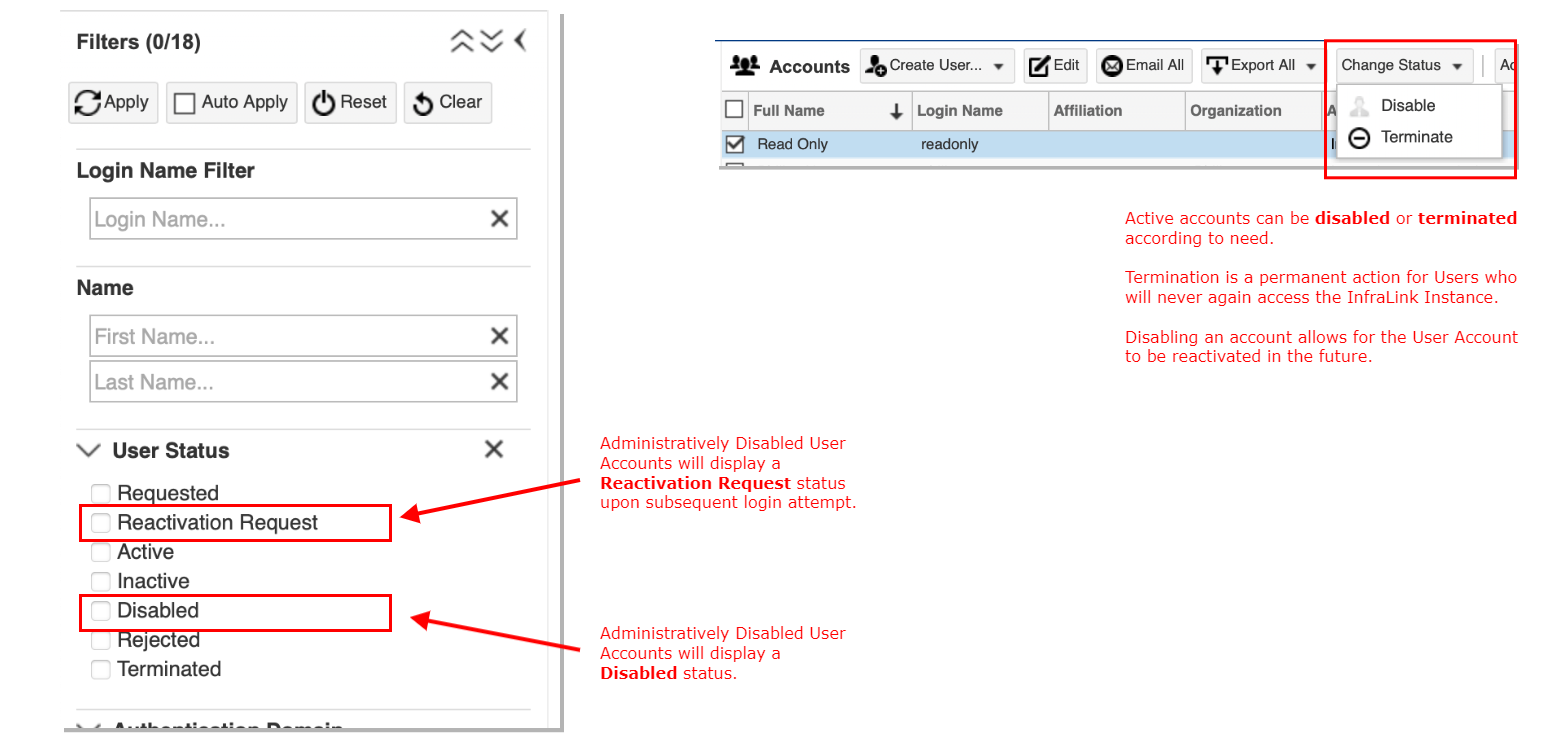
As a security measure, InfraLink User Accounts are automatically deactivated after a period of inactivity. The length of that inactivity period is defined by the instance administrator, but most instances utilize the default setting of 35 days. User Accounts may also be manually disabled by an administrator for a variety of reasons, such as a User no longer supporting a project.
Historically, to regain access to an instance, the User had to contact the instance administrator or Helpdesk to request account reactivation. With Users working a variety of shifts across a number of time zones, this process could sometimes experience delay.
Reactivation Policy per Authentication Provider
To improve the User experience, InfraLink now offers an Account Reactivation Upon Successful Authentication setting, configurable per Authentication Provider. This setting offers two options:
To effectively apply the reactivation policies, InfraLink now differentiates between Automatically Deactivated and Administratively Disabled accounts. Specifically, the User Account status will be set to "Inactive" after the instance-defined period of inactivity, and the User account status will be set to "Disabled" when the account is manually disabled by an administrator.
Reactivate policy Impacts:
Request Reactivation Policy Impacts:
Reactivation policy settings are not configurable from the User Interface (UI). Policy changes must be implemented at the database and require support from your InfraLink Operations Team. |
What You Will See in the User Interface:
PowerDB, an equipment testing platform, is designed to manage electrical power Assets including their test results, ongoing inspections, and reliability analysis through test instrument interfaces and entity specific data forms. To streamline the planning and execution of testing activities and to improve data integrity throughout an installation and/or maintenance life cycle, InfraLink now offers integration with PowerDB.
This integration service allows Project Administrators to provision tests in PowerDB utilizing the Asset records currently maintained in InfraLink. Additionally, it allows technicians to perform tests and record results via PowerDB without the extra step of copying that data over to InfraLink.
For additional information on PowerDB integration with InfraLink, contact InfraLink Support. |